This is a nice midi controller that I picked up from an online seller. I took all the midi foot switch buttons and moved them up. Below I installed foot switches to control a Peavey Mace guitar tube amp. Now this pedal doubles as a multi-functional pedal. For this amp controller board I added a battery pack for the led indicators but it has a standard 9VDC jack. Now no AC/DC plugs are needed.
Here is a vintage Magnatone M12 “The Brute” tube amplifier under restoration. This amp had some unique characteristics tonally. This version loaded with a 12″ driver is harder to find in the “M” series. Recently the company has been revived www.magnatoneusa.com
This is a fantastic resource link for the vintage Magnatone M12. Unfortunately there site is down so I have placed a link through my trusty way back machine. https://www.magnatoneamps.com/M12.html
This M12 photographed was my first amp for guitar and I played on a Teisco Spectrum. I garbage picked the M12 with original cover still on it. Always worked operationally, the new finish was much needed. Not many manufacturer’s utilize such a large amount of distance between the power supply and circuit. Also bottom weight made it less prone to tipping. I always remember the lows to be a nice natural growl with some clipping. I would blend this amp with a single speaker solid state amp to make up for the lost high’s. Almost always running a Yorkville Bloc 100G.
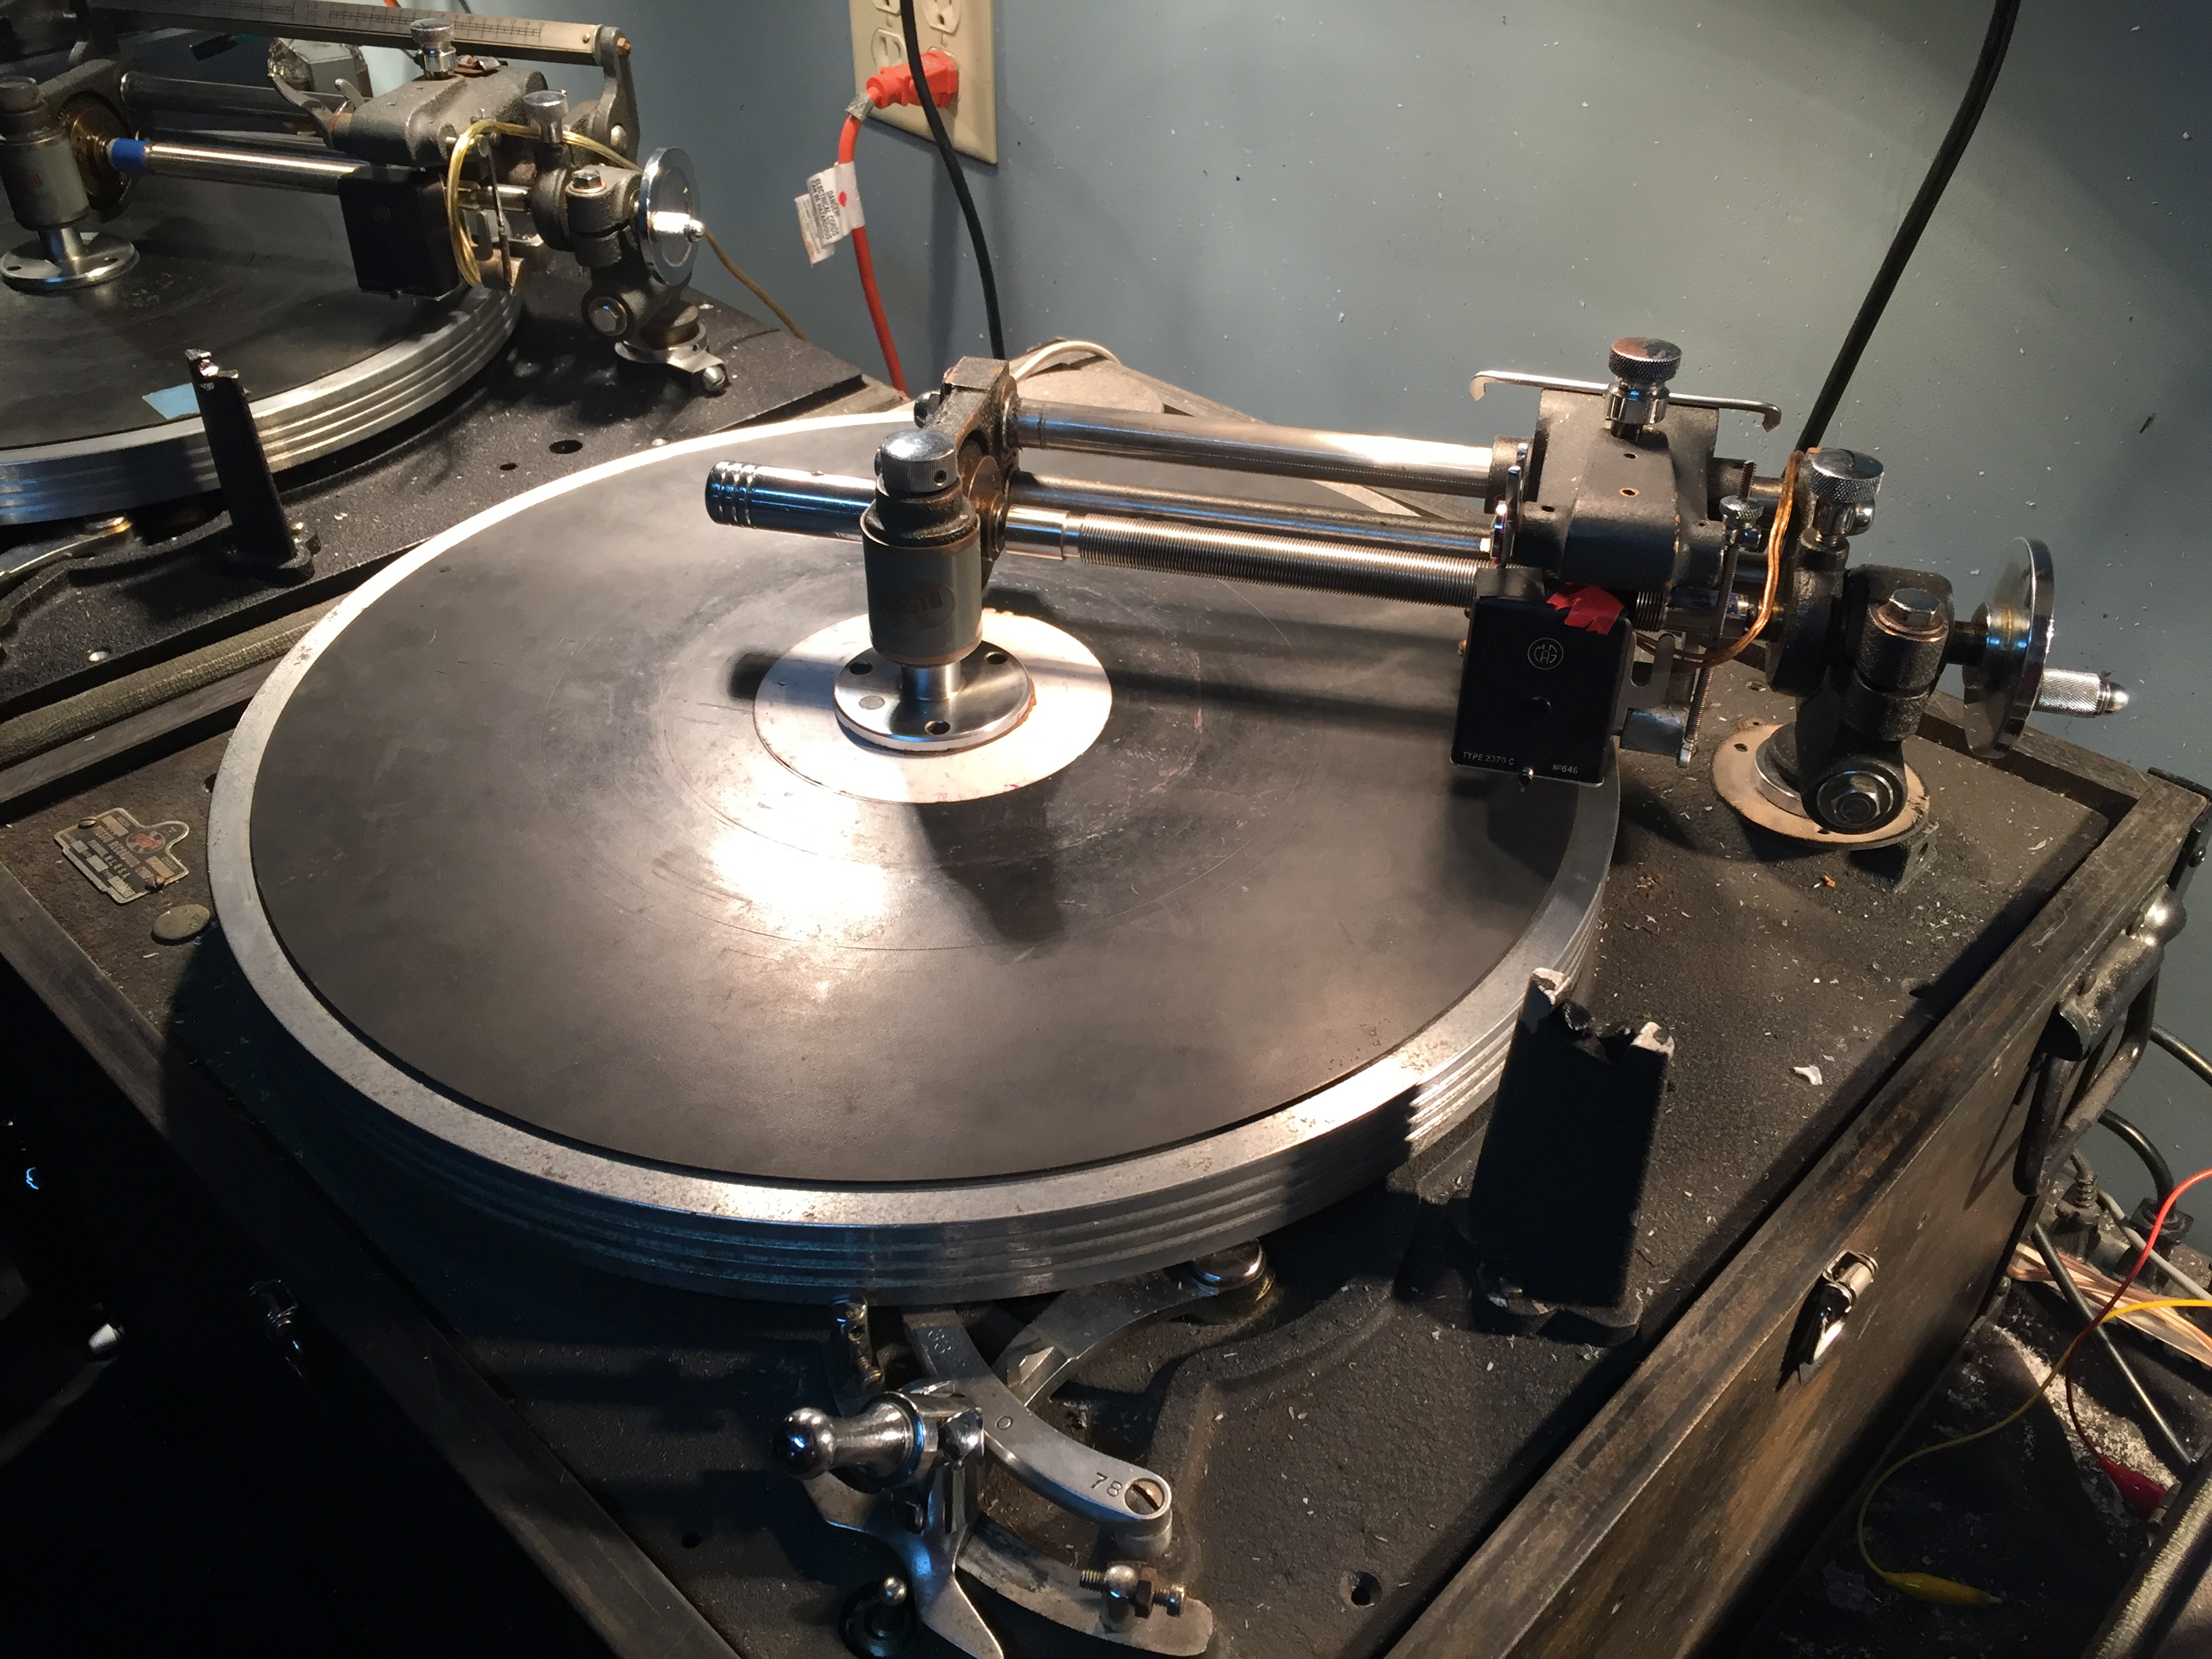
Since the beginning of making records there were devices available to record onto records by using a lathe cutting machine. These machines were marketed to professional music engineers and also consumers. Using a specific cutting head you would in real time, groove the record with playback audio. Recently I had the chance to visit www.lathecuts.com a CO-OP lathe cutting facility in Tucson, Arizona. Here multiple artists offer different takes on production, training or demonstration of the complex skill in making lathe cut records.
If you would like to learn more about Disc Mastering try some of these
Basic Disc Mastering (Second Edition) by Larry Boden
How to Make Good Recordings by Audio Devices
Here is a list of some Lathe Machines that range in price and quality
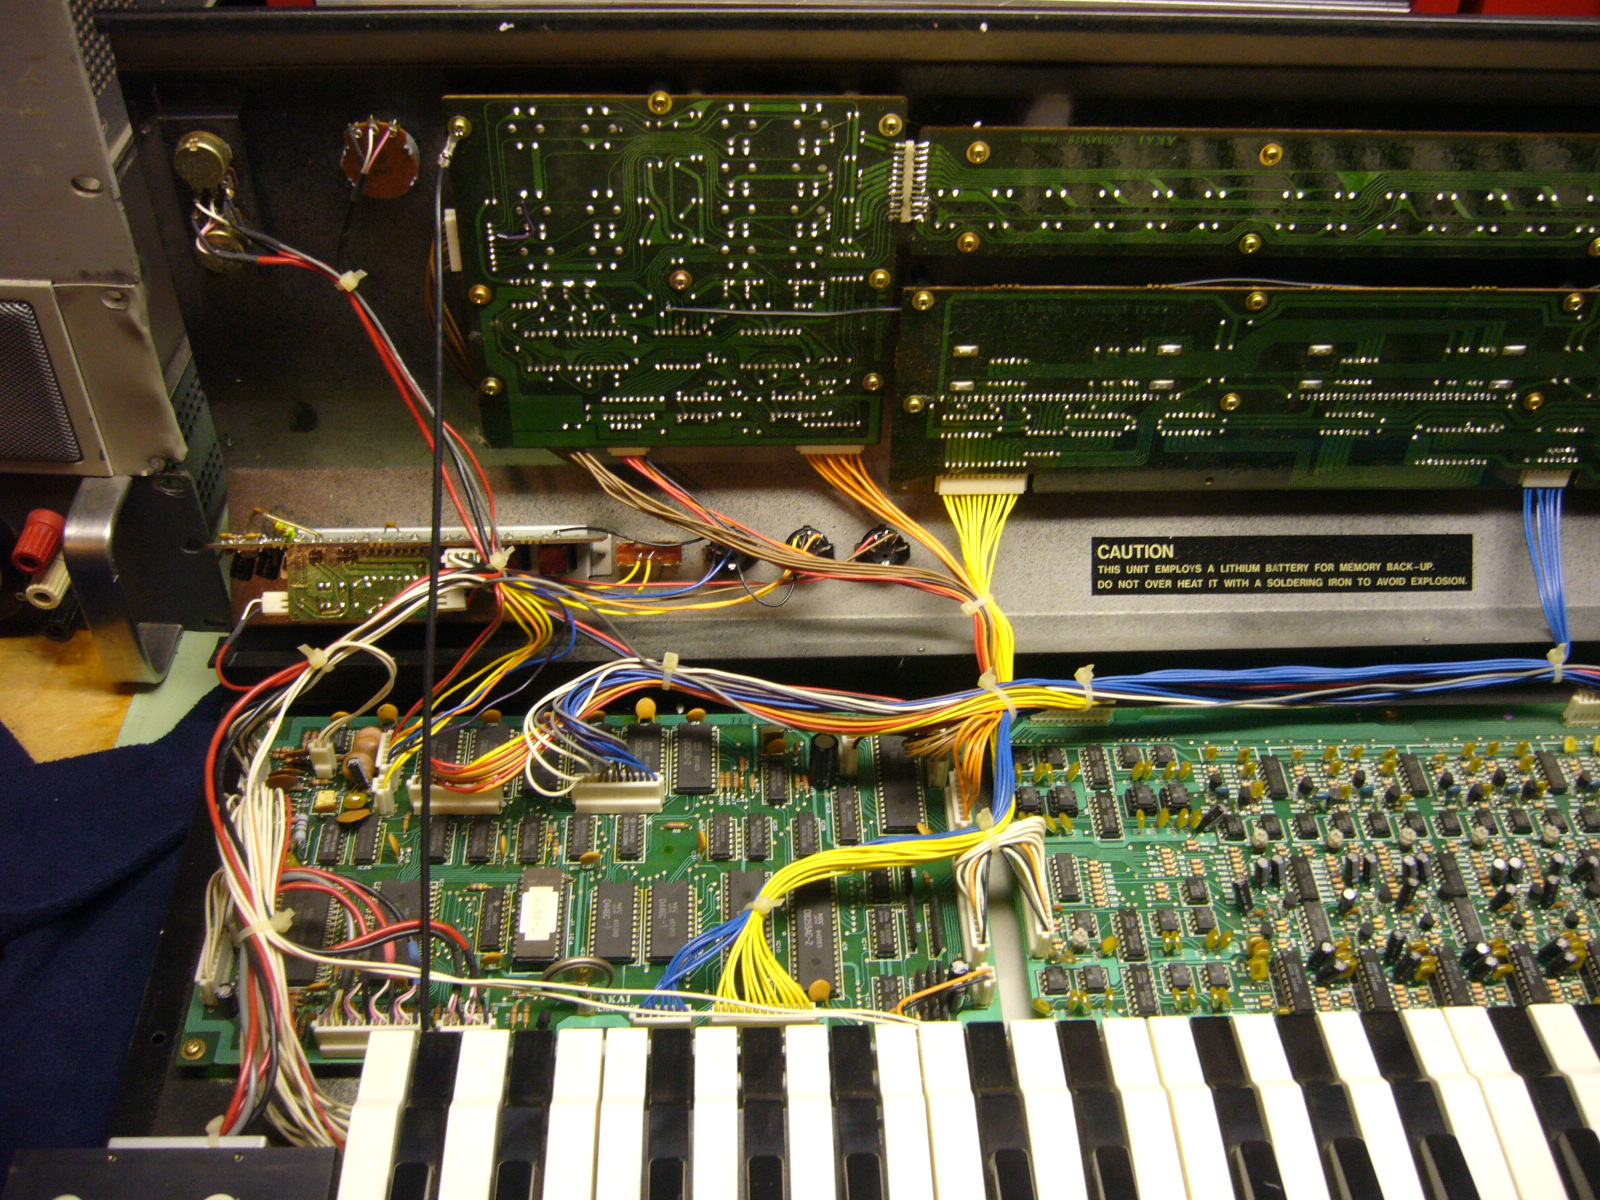
This is a unique synth that reminisces through a time of particular circuitry. The unit itself looks the part, but it’s true glory in design relies on how you interpret the controls to master it’s depth. This was the video I watched before I saw it’s potential for what I sought.
It is my main controller via MIDI. Note: Reflow the solder of joining connections to membrane button boards. Inspect with a loop. Never should you have to press hard on the buttons unless the tact switch is bad, I did this fix and the my problem of intermittent control went away permanently.
In edit mode you select a number which corresponds to the illuminated bars above, adjusting the level of the parameter. This feature can be simplified (finding your tone/characteristics) by running a midi-in arpeggiator sequence while adjusting your parameter/s. After you like your sound, save it and try playing without the midi.
I route my tape-out midi dump straight into a DAW for archiving. Attached you will find patches 1A, 1B, &1P.
I had a chance to play on a mint original Ampeg V-9 guitar amplifier with distortion. The crunch on the distortion was alive, rich, unique and the power through a 4×12 V-2 cabinet was face melting. The original cabinet had 9×10 speakers in upside V formation and one could only imagine the full fury of 300w Tube power through that monster. These original Magnavox USA tubes all pegged my century 100 tube tester to max power. Small little fires glow in them.
*For some reason I decided to re-cap this unit. Feelings were never the same after the sound changed.
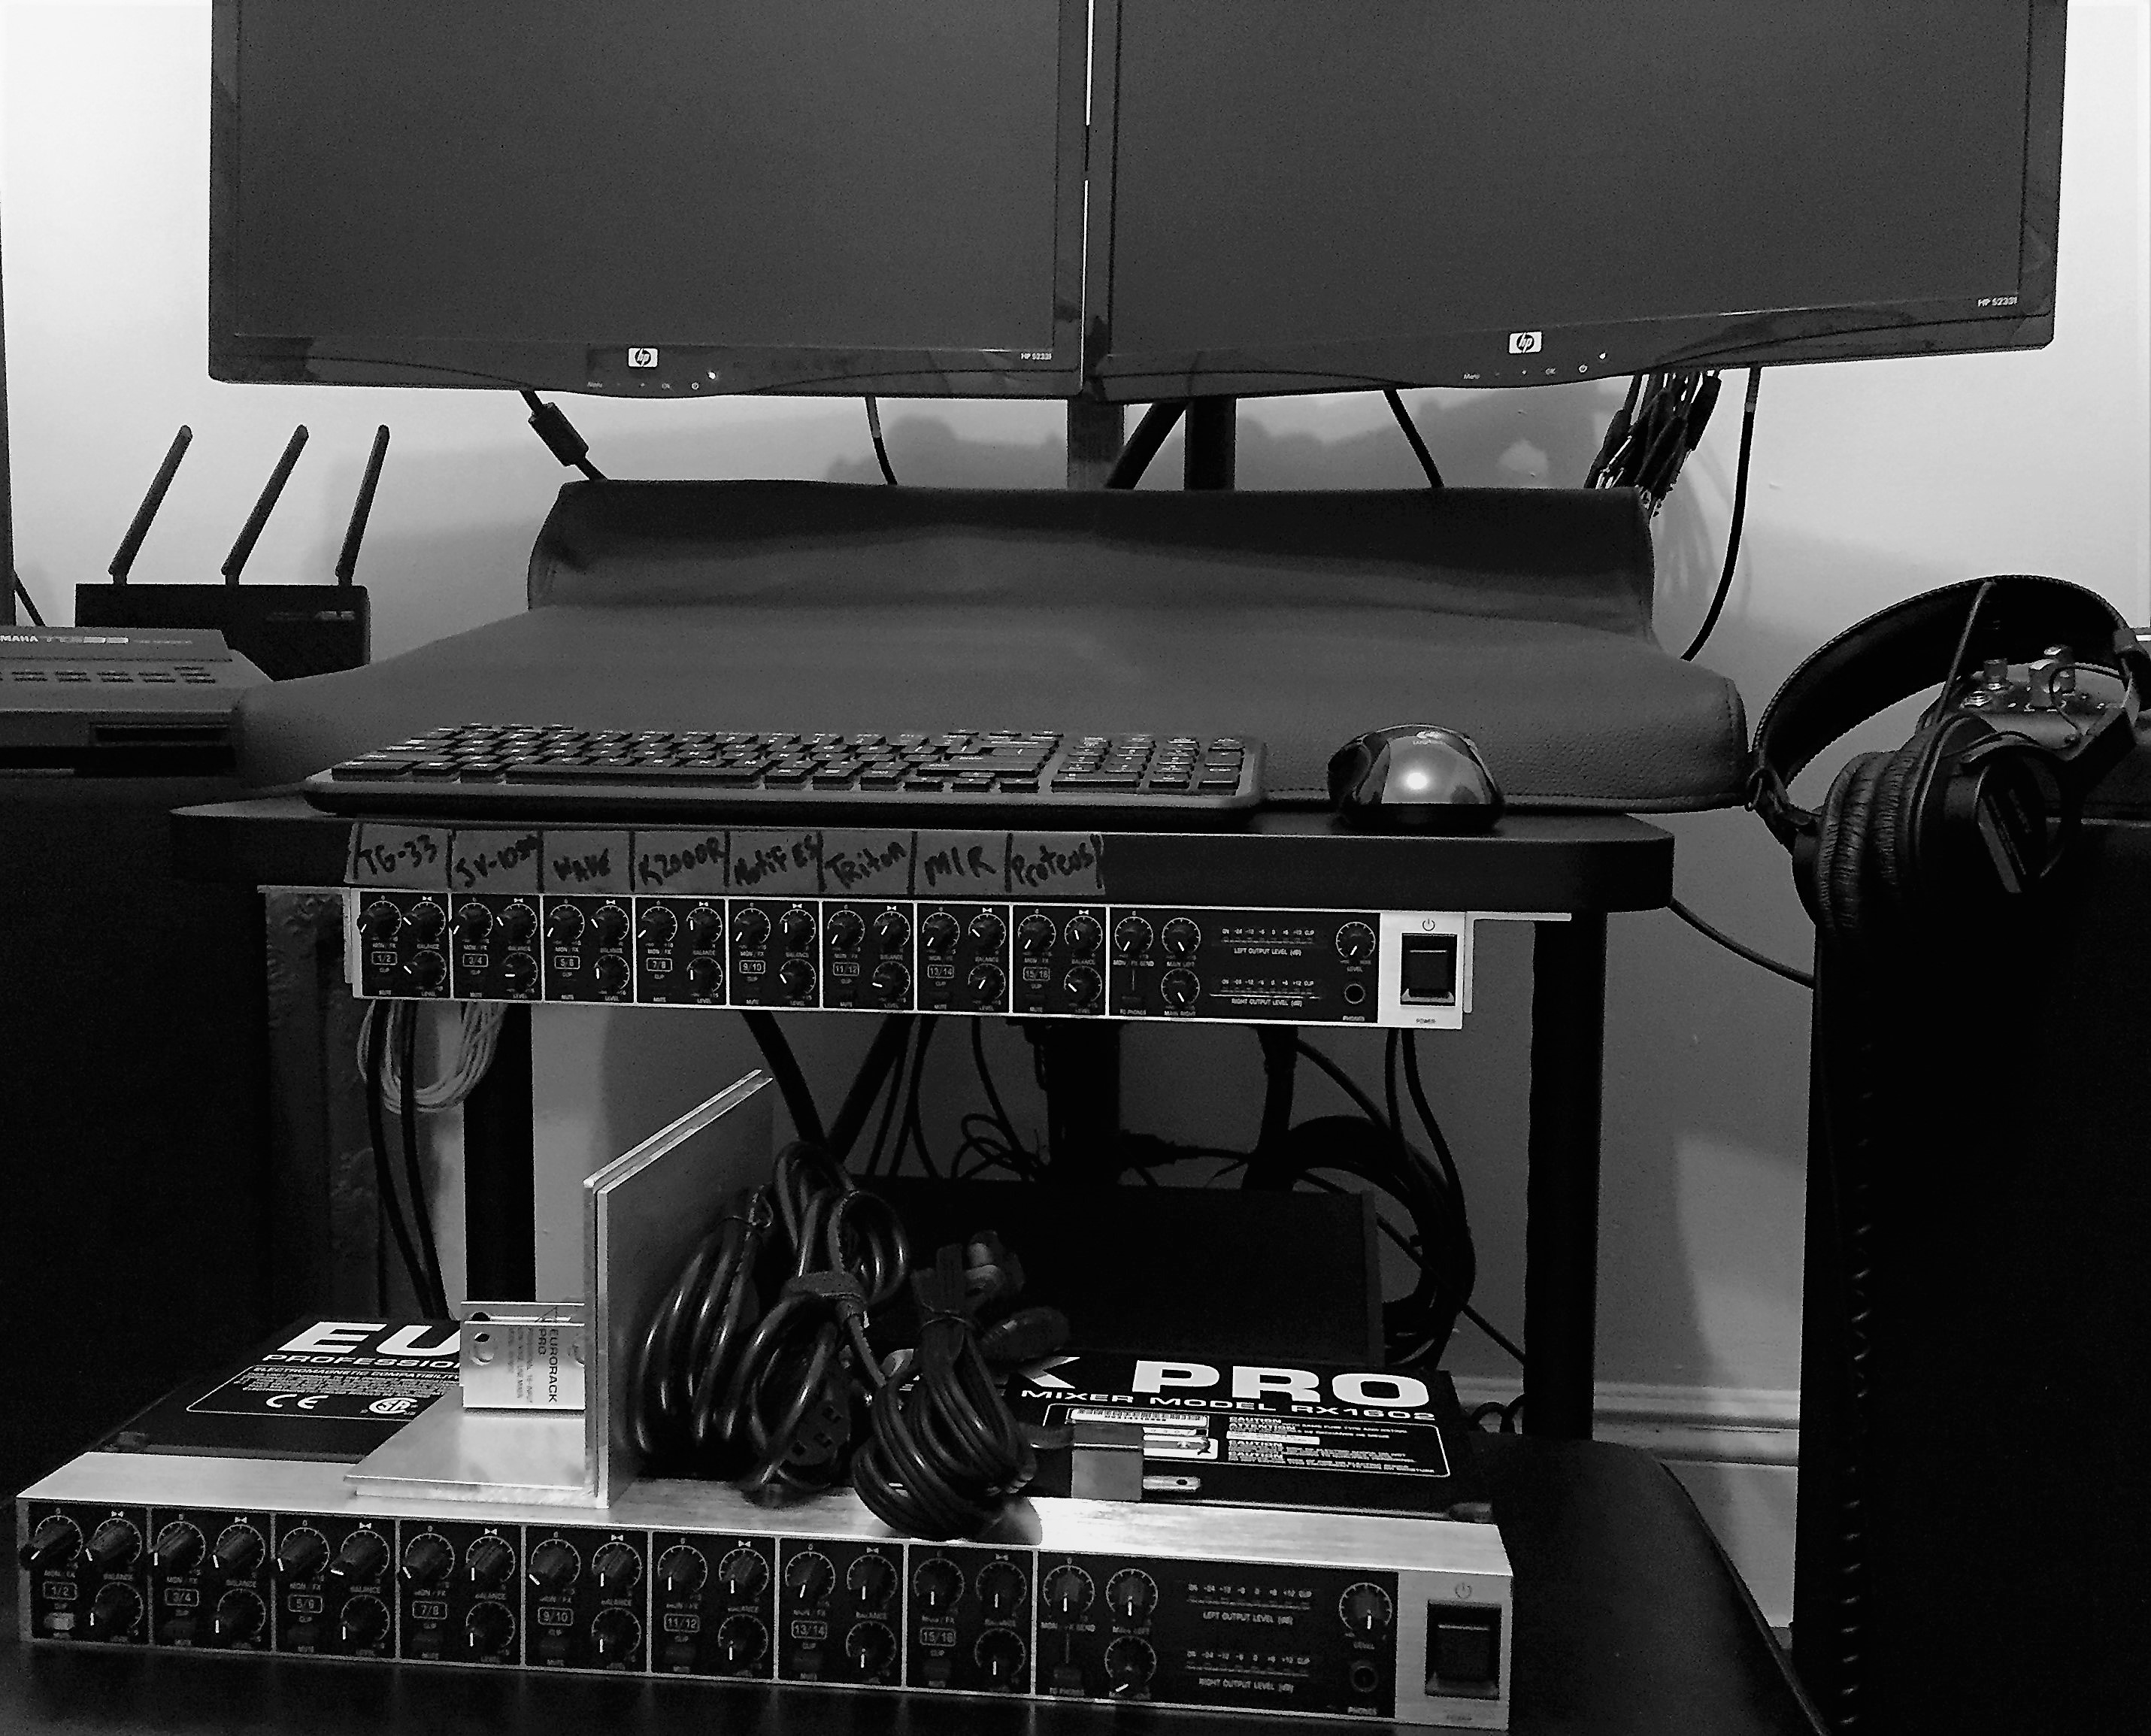
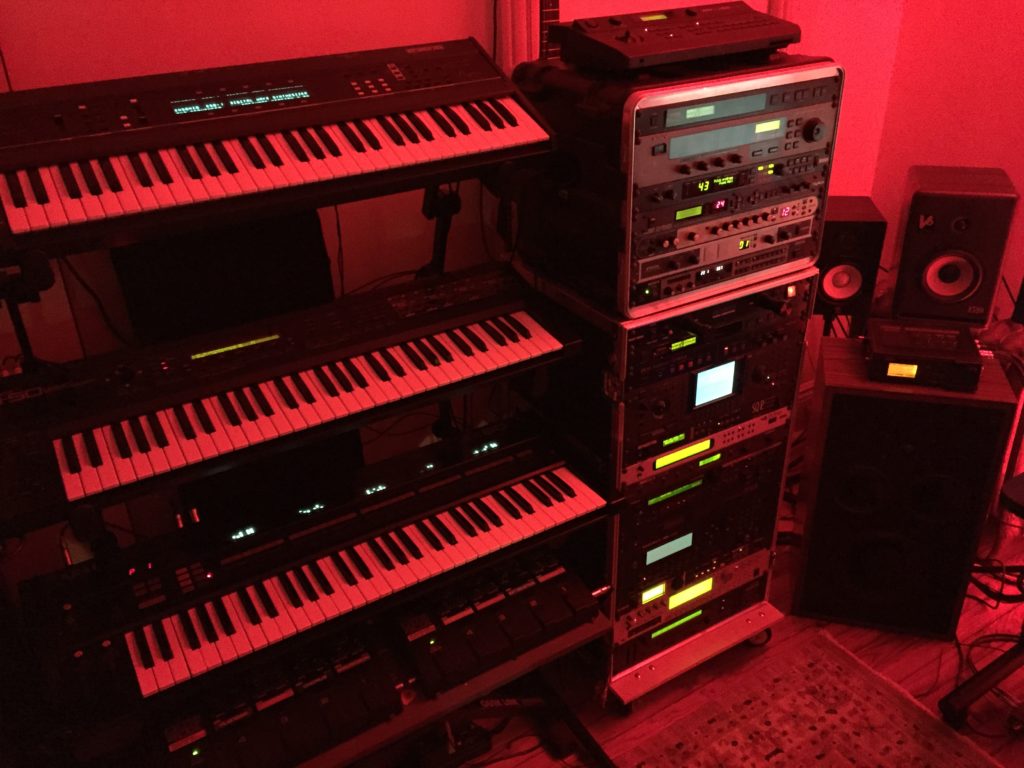
For this setup I ran all the 16 synth’s into two 8 channel stereo mixers using 2 16ch snakes. I took the stereo mixes of each rack mixer and ran them into 2 stereo channels on the main mixer. Using the mute buttons I can easily select which synths to blend for unique single tracking sounds. This is helpful if you don’t have 32 available inputs for all your synths. During Installation custom ears were made to double mount the two mixers on the underside of this table becoming part of the main mixer sub mix controls.
About to mount the 2 units with an extended plate.
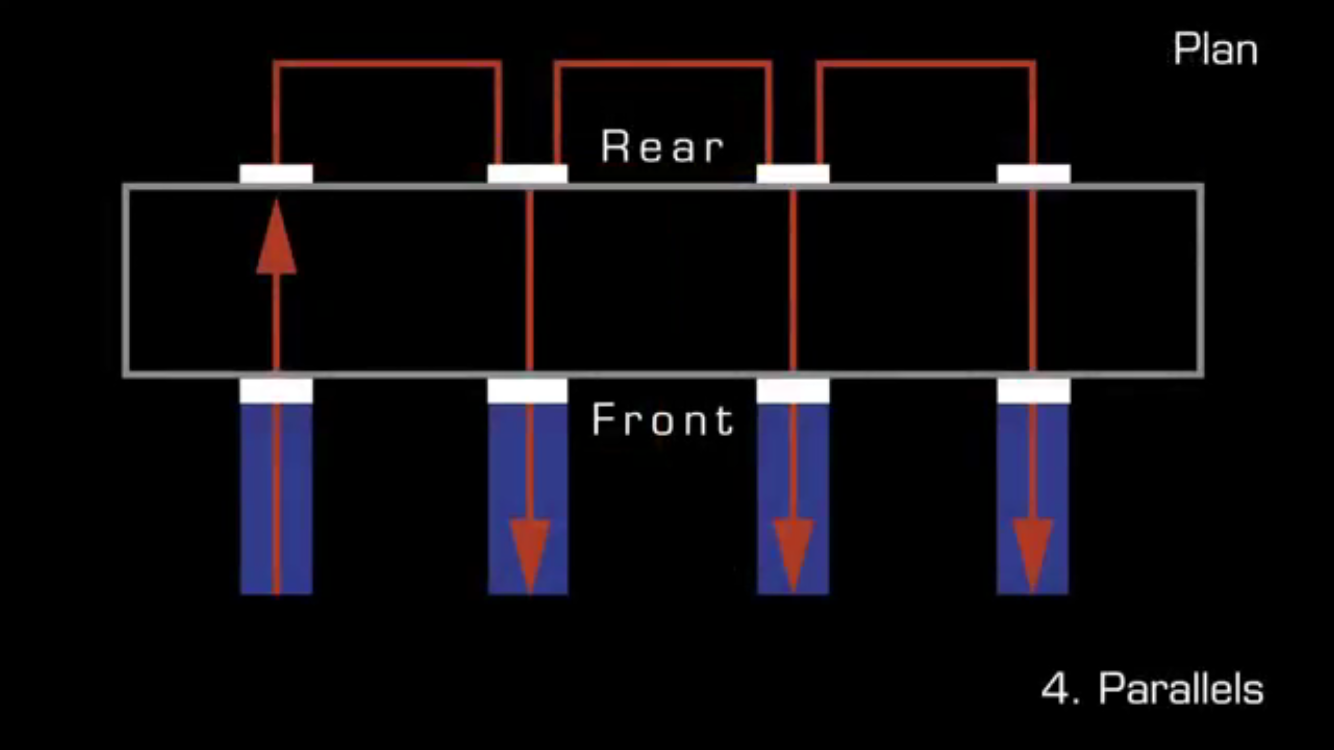
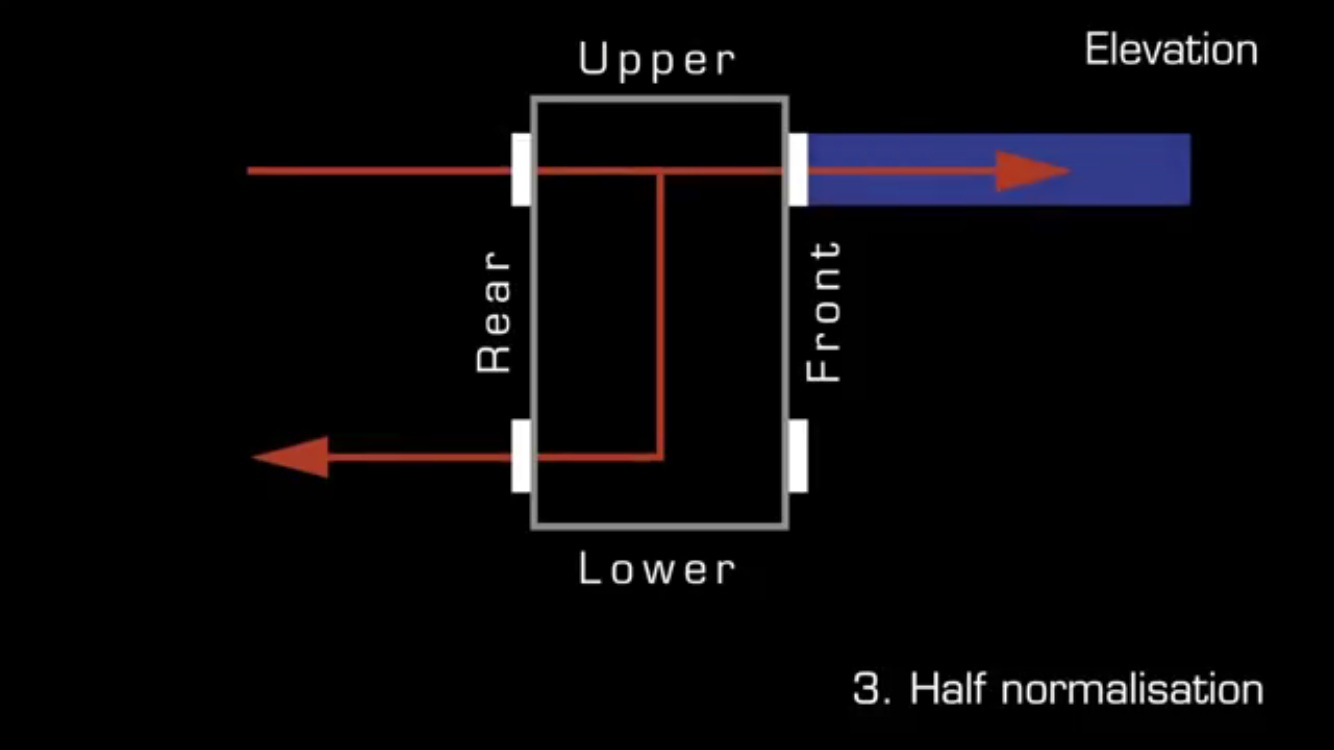
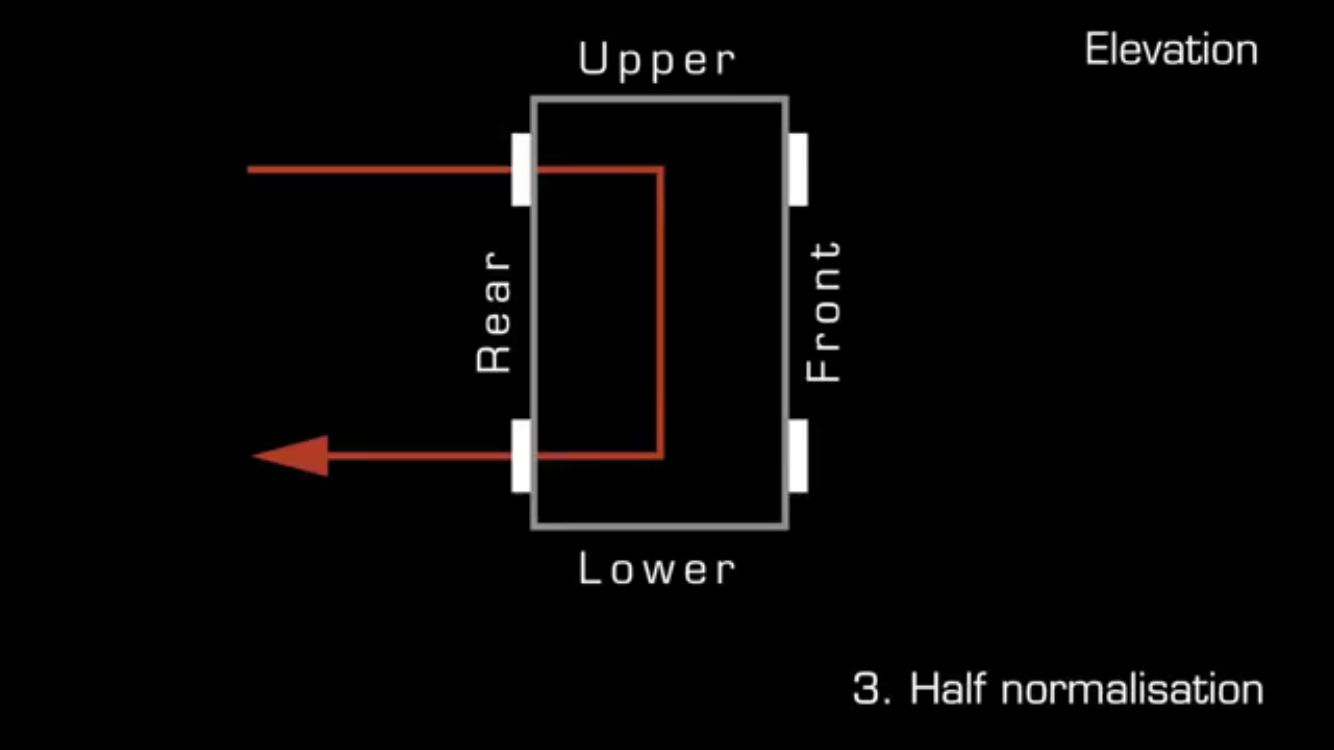
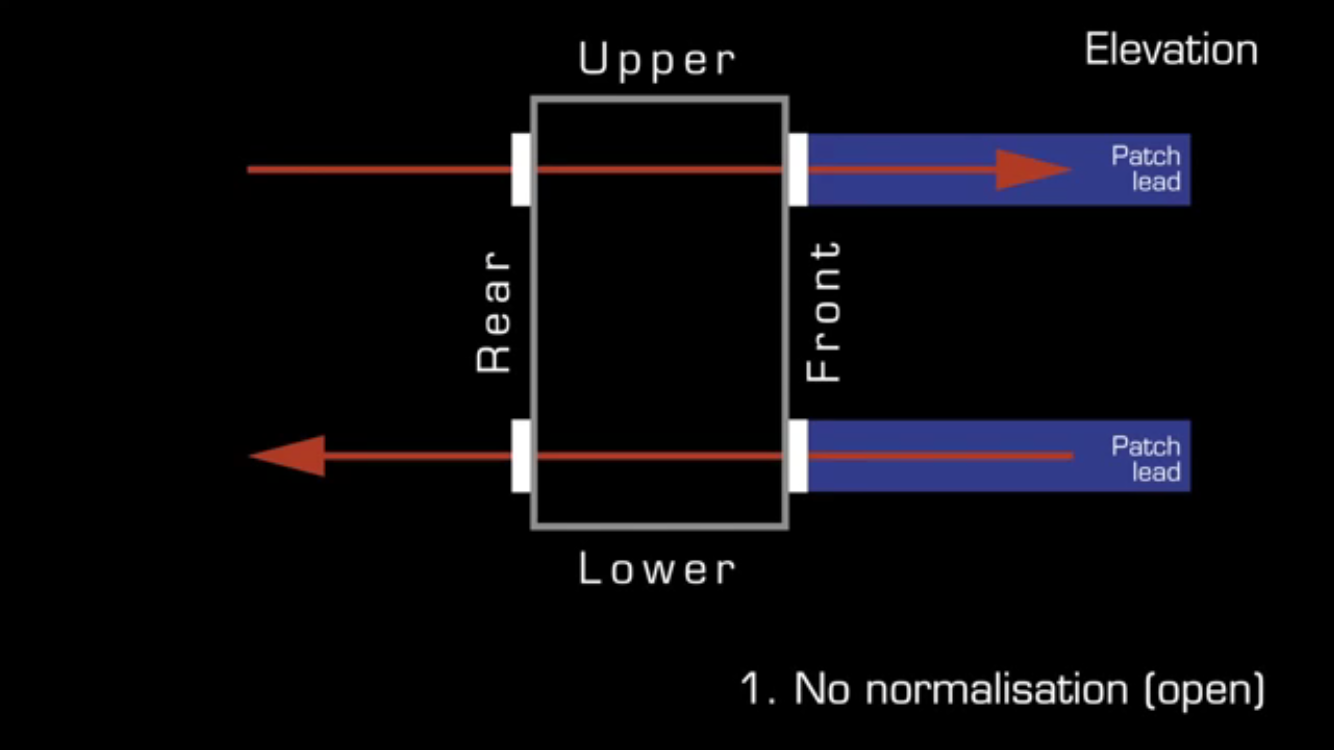
Wiring all of your devices accessible in the signal line can be daunting if you don’t use patch bays. Whenever a larger number of devices are present patch bays help simplify. Wire every device and connection to your patch bay, IN’s and OUT’s. Using small patch cables you choose which effect, synth or keyboard to run. Here are some useful images to understand the different arrangements a patch bay may be configured. If you wondering which one to get, buy a full TRS patch bay with selectable routing on the front.
If you would like to dive deeper into patch bays you can learn more by downloading this resource below.
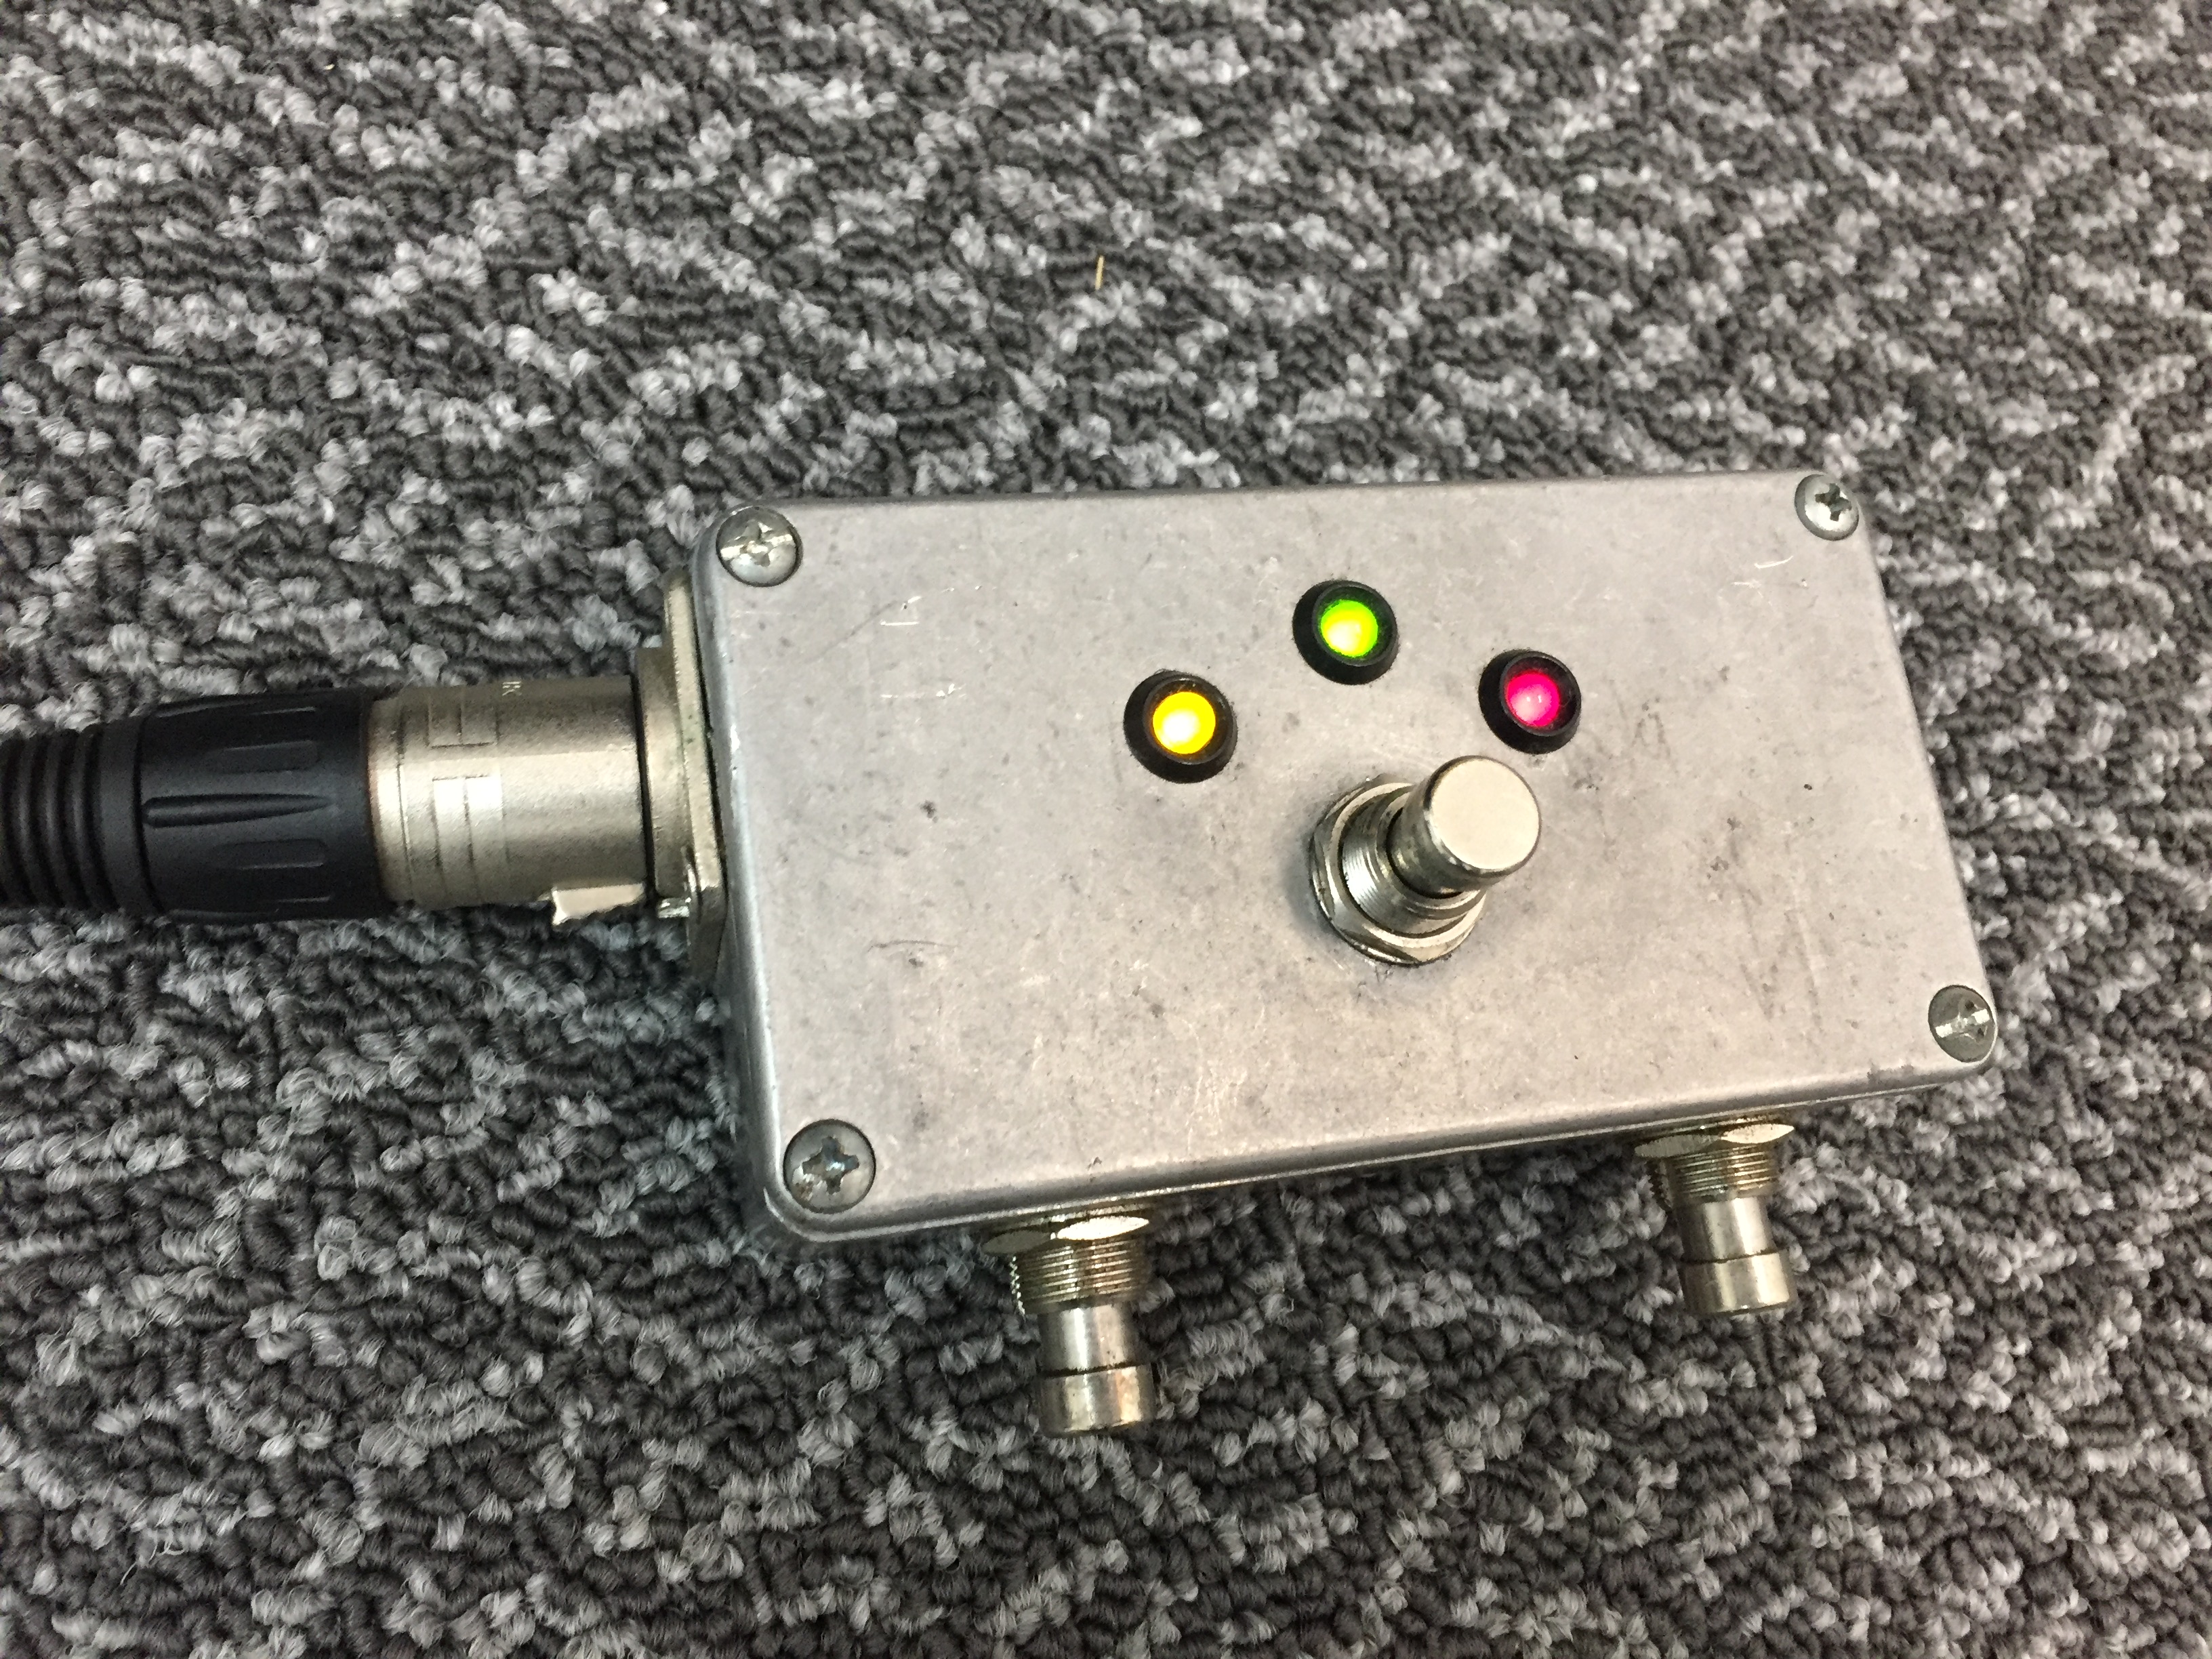
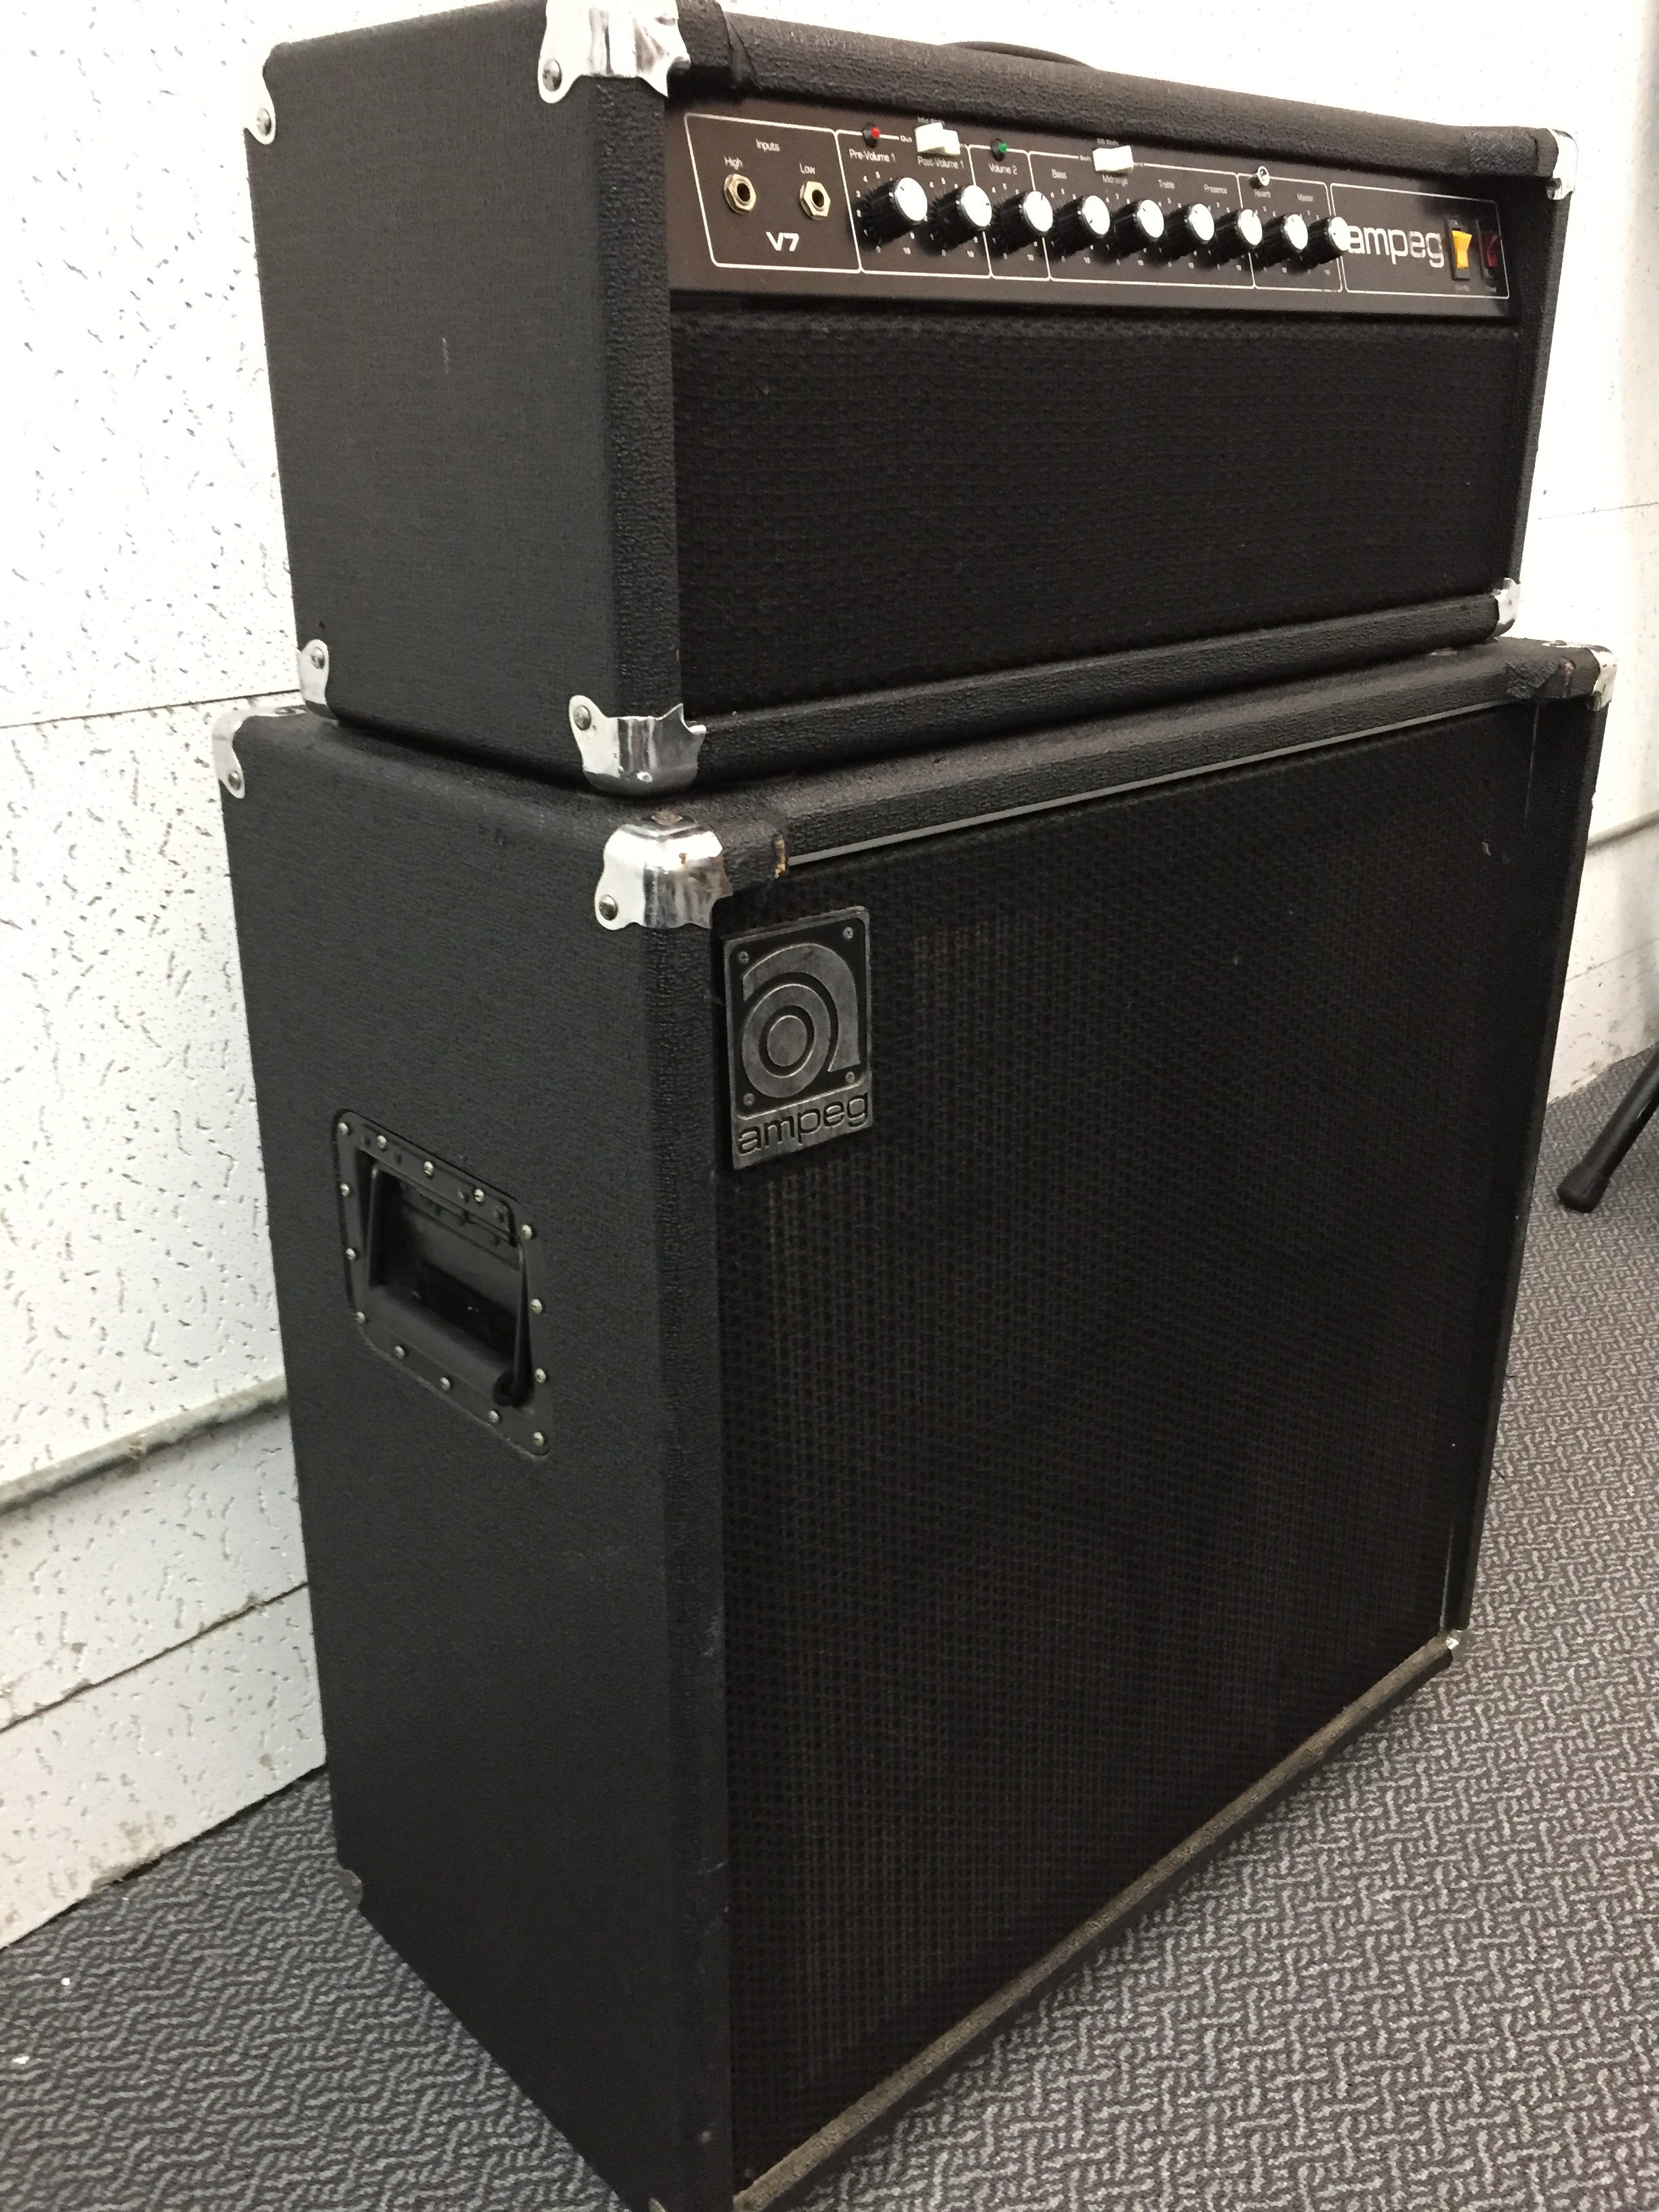
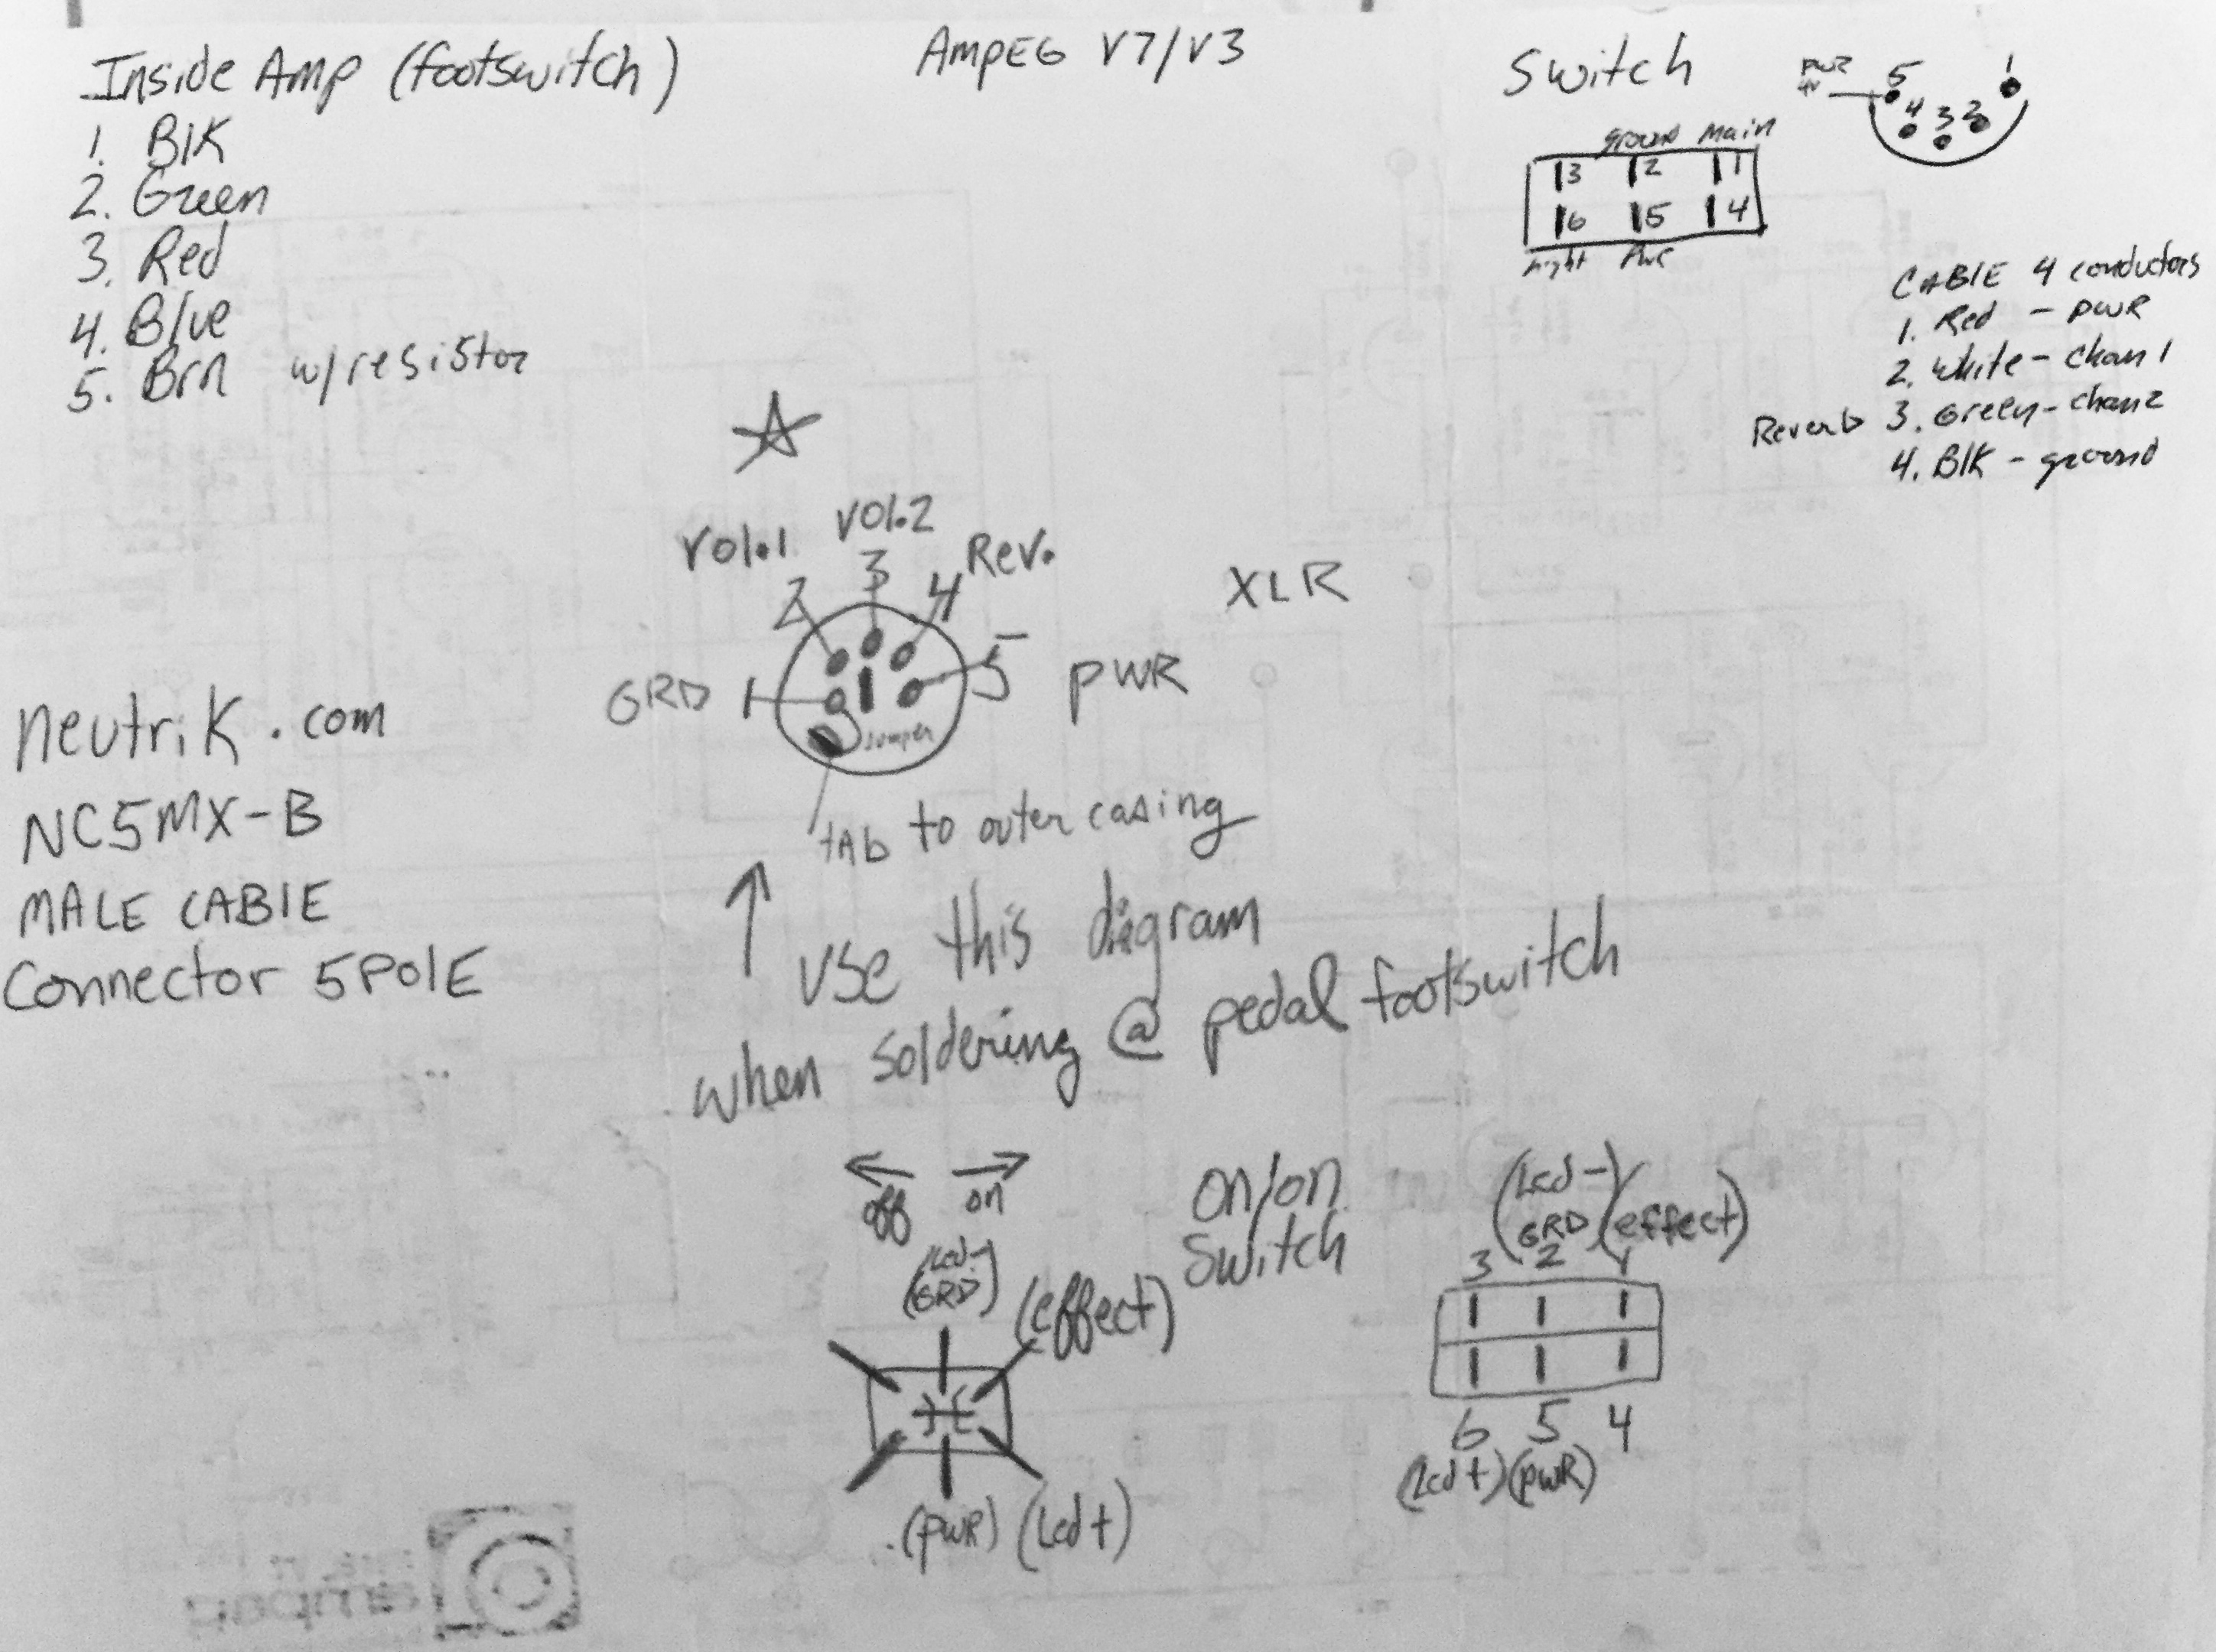
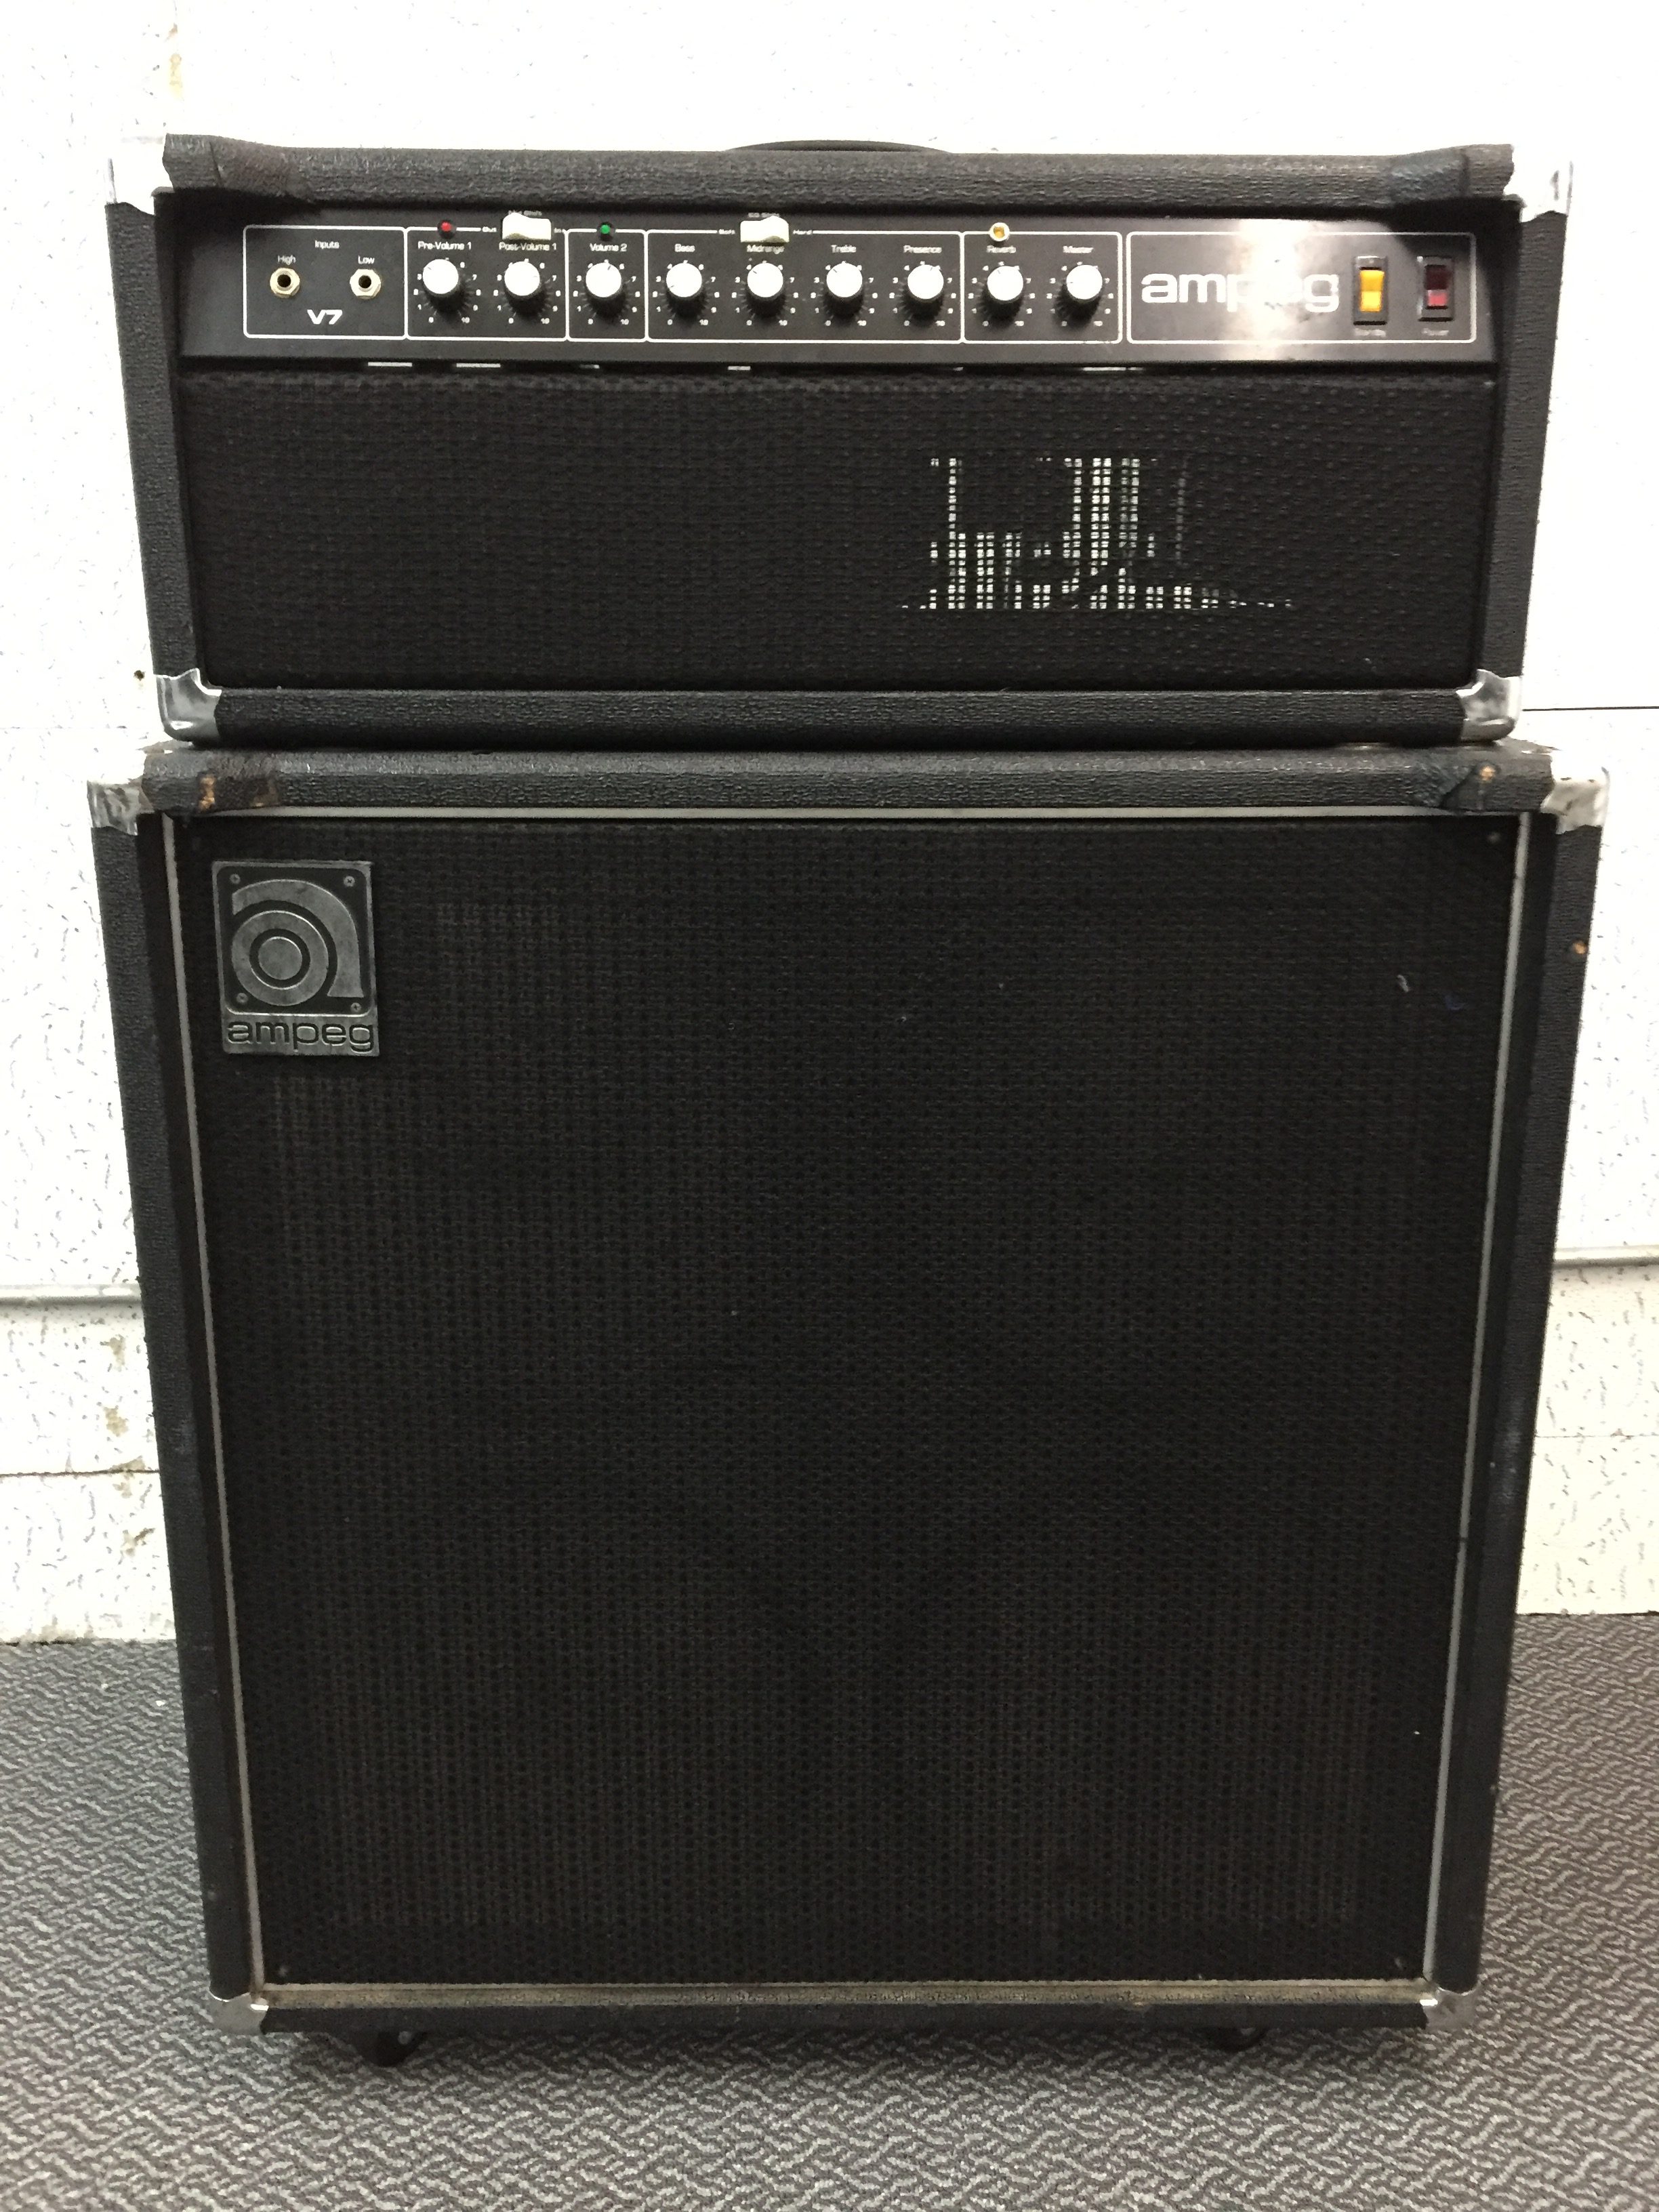
This is the Ampeg V-7 Guitar Amplifier. The footswitch is a powered three channel XLR 5 Pin Configuration. On the Main Board of the V-7 it controls what the switches modify. Located at the bottom of the schematic you will see where I labeled the 5 Pin XLR. Most of the time I wire my pedal to only have one button, for distortion. This unit above has the reverb and channel 1 as kick switches, pedal should be securely mounted to kick “ON” function.
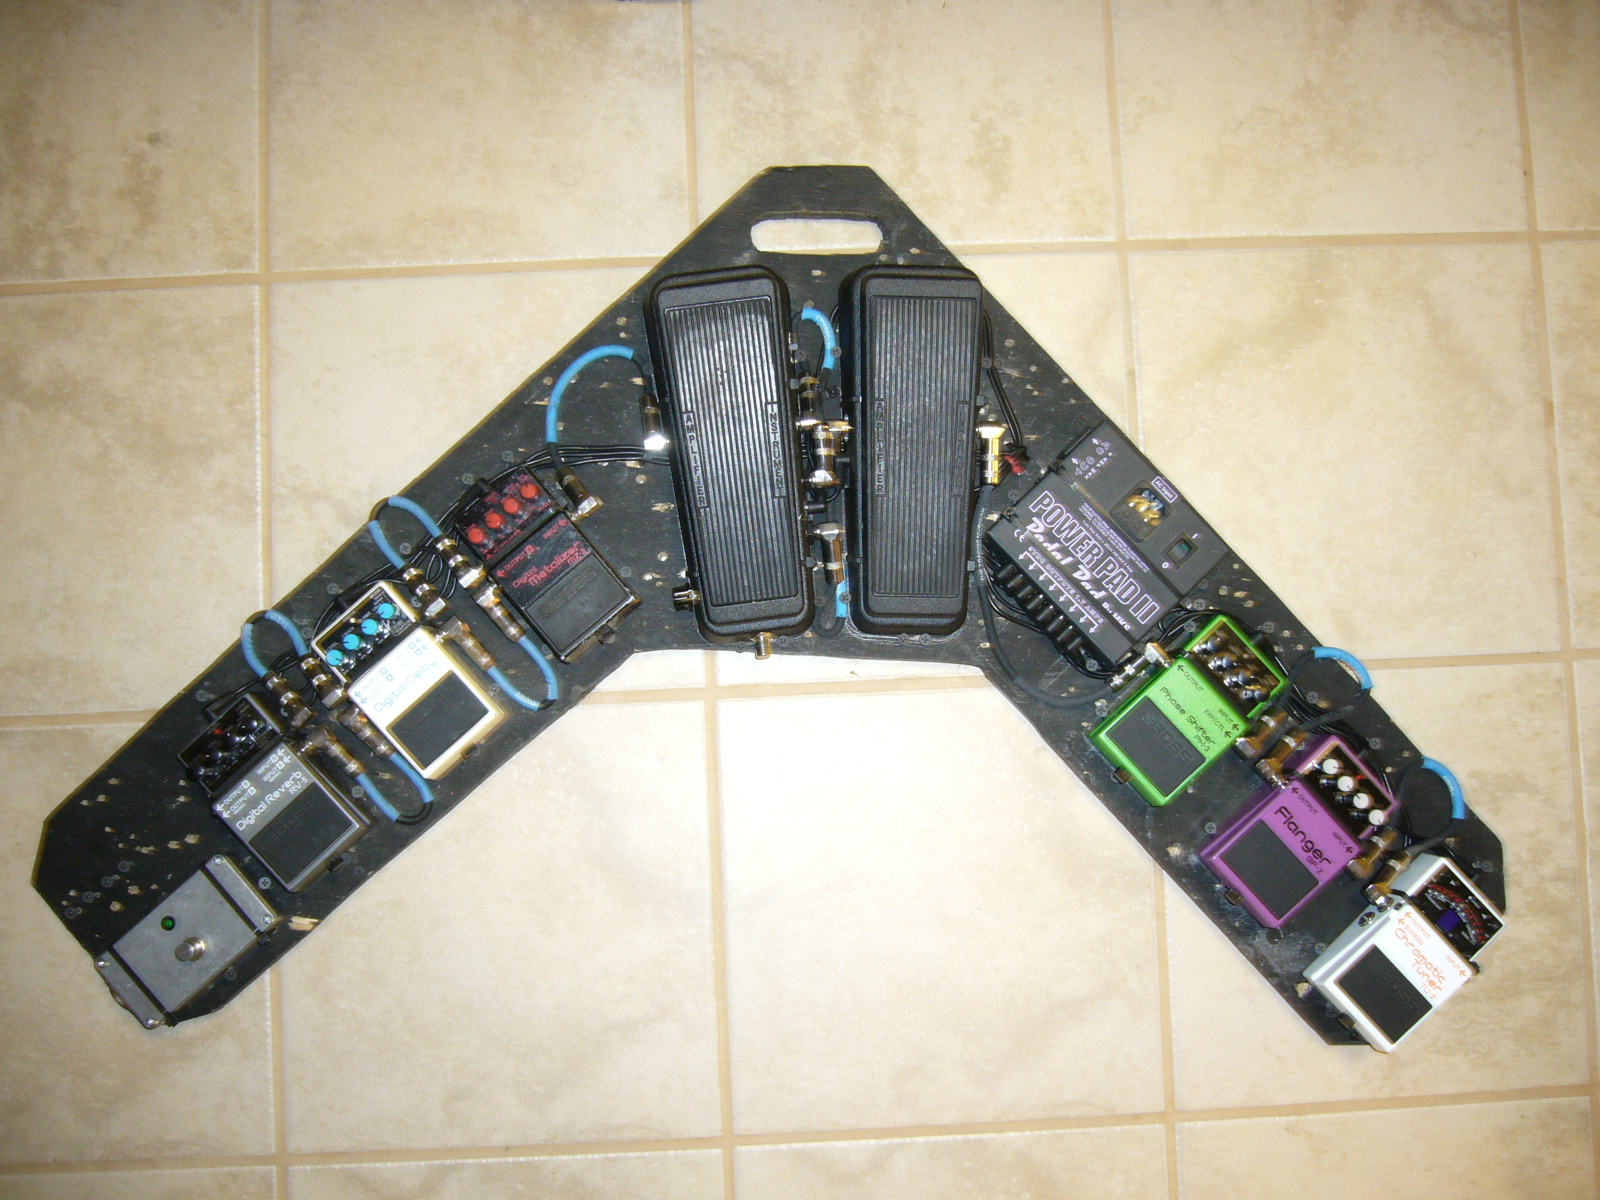
V design with double Classic Cry Baby Wah. The Wah on the left has been modified to incorporate a front facing “kick on” switch. It engages a Dunlop Power Booster that has been inserted into the shell. Volume to boost is on the bottom left of pedal. Stereo chain from distortion to out through. The custom pedal on the left is a 5pin xlr input box for controlling an Ampeg V-7 (CH1, CH2 & Reverb). This box has been simplified for head distortion control only. The version with all three uses the same box but has 2 buttons on top pan L/R & 1 “front kick” placement switch. (From L to R) V7 controller, Digital Reverb RV-7, Digital Delay DD-3, Digital Metal MZ-2, Dunlop Cry Baby X2, Power Pad II, Phase Shifter PH-3, Flanger BF-2, Chromatic Tuner TU-2 on .5″ Plywood Custom Board.
Pedal Board shapes should vary based on your live performances and comfortable stance. Try to think about where the microphone stand would sit if you play effects and sing. From those ideas sketch out your shape on a blank board and cut/paint/finish.


